Skip to Content
★
4.9/5 Rating Rated by 800+ Customers on Google
🚚
Free Delivery Above ₹499 On eligible online orders
📍
Pan India Delivery Delivery across India
🛠
Built for Makers Robotics • Electronics • DIY
🎓
Student Friendly Perfect for projects & learning
🚀
Startup India Recognized Recognized startup company
🏬
Physical + Online Store Visit us in Pimpri or shop online
★
4.9/5 Rating Rated by 800+ Customers on Google
🚚
Free Delivery Above ₹499 On eligible online orders
📍
Pan India Delivery Delivery across India
🛠
Built for Makers Robotics • Electronics • DIY
🎓
Student Friendly Perfect for projects & learning
🚀
Startup India Recognized Recognized startup company
🏬
Physical + Online Store Visit us in Pimpri or shop online

Arduino Automatic Dry And Wet Waste Segregator DIY Kit

Specification Details
Project Type Dry & wet waste sorting — educational DIY kit
Controller Arduino UNO SMD compatible, pre-programmed
Sensors HC-SR04 ultrasonic sensor + moisture sensor set
Sorting Mechanism SG90 9g servo motor
Power Supply USB 5V; 1.5 m cable included, USB source required separately
Assembly Required Connect electronics and build the cardboard body; no coding or soldering required
                                 Price

🚚 FREE Delivery on Orders Above ₹499
📦 Pan India Delivery


₹ 635.59 ₹ 635.59 ₹ 999.00
(Tax included)

Barcode: 301203

ROBOGEARS / DIY KIT 301203

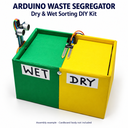
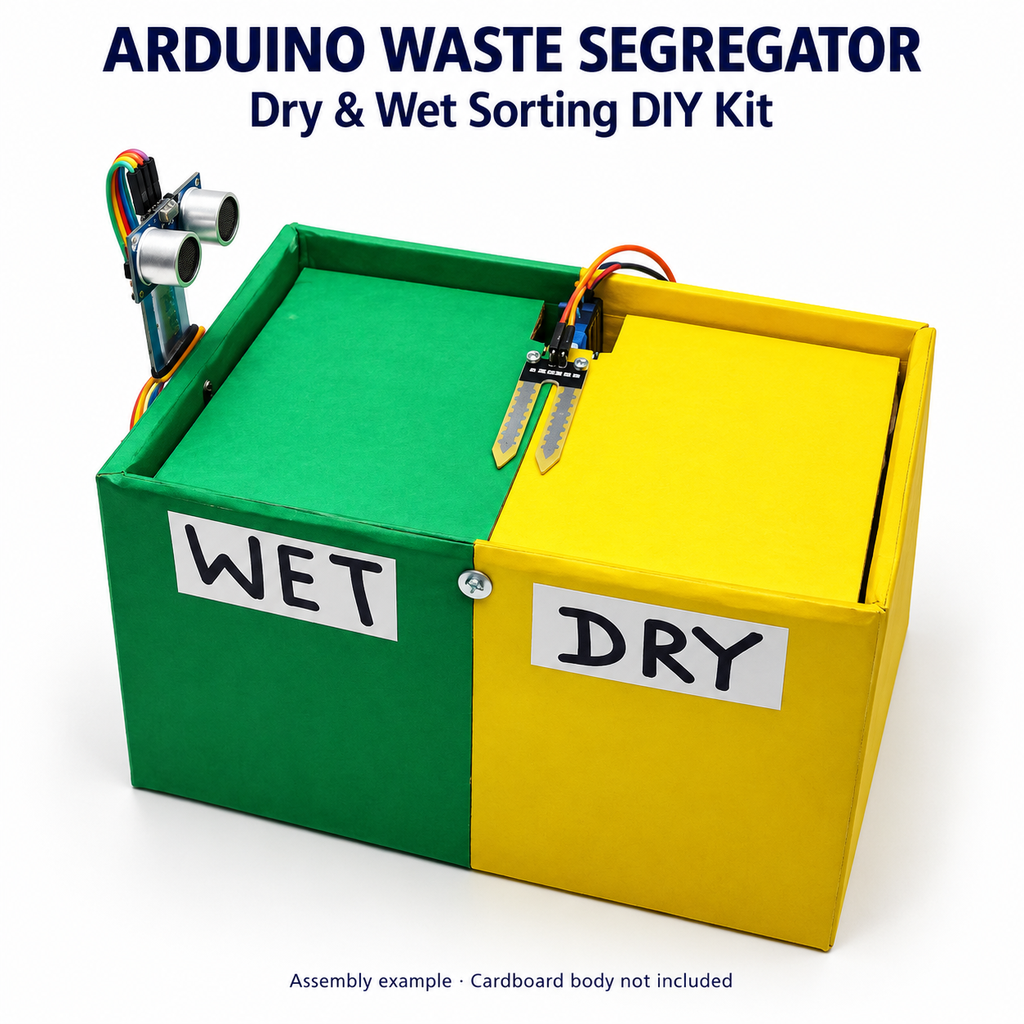
Build your own
dry & wet waste sorter.

Arduino Dry & Wet Waste Segregator DIY Kit.
Connect the electronics. Build the model. Explore how it sorts.

Pre-programmed UNOSG90 servo included1.5 m USB cableCustomer-built body

Choose a section · Use the arrows to explore

01 / YOUR BUILD GUIDE

Build a model that senses and sorts.

Explore object detection, moisture sensing and servo movement in one hands-on educational project.

Detect

The ultrasonic sensor detects a sample in front of the tray.

Classify

The moisture probe provides an analog reading for the Arduino’s wet/dry decision.

Sort

The servo tips the tray toward a compartment, then returns it to the centre.

Project detailSpecification
Product code301203
ControllerPre-programmed Arduino UNO SMD compatible
SensorsHC-SR04 + resistive moisture sensor set
ActuatorSG90 9g servo
Power connectionUSB Type-B on UNO; 1.5 m cable supplied
Customer solderingNot required; shared-power headers fitted
PurposeEducational demonstration
Phone appNot required

Learn by building

Practise digital timing, analog sensing, conditional logic, servo positioning and mechanical alignment. Test how sample contact and sensor placement affect the result.

02 / YOUR BUILD GUIDE

Check your kit before you begin.

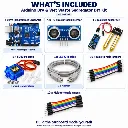
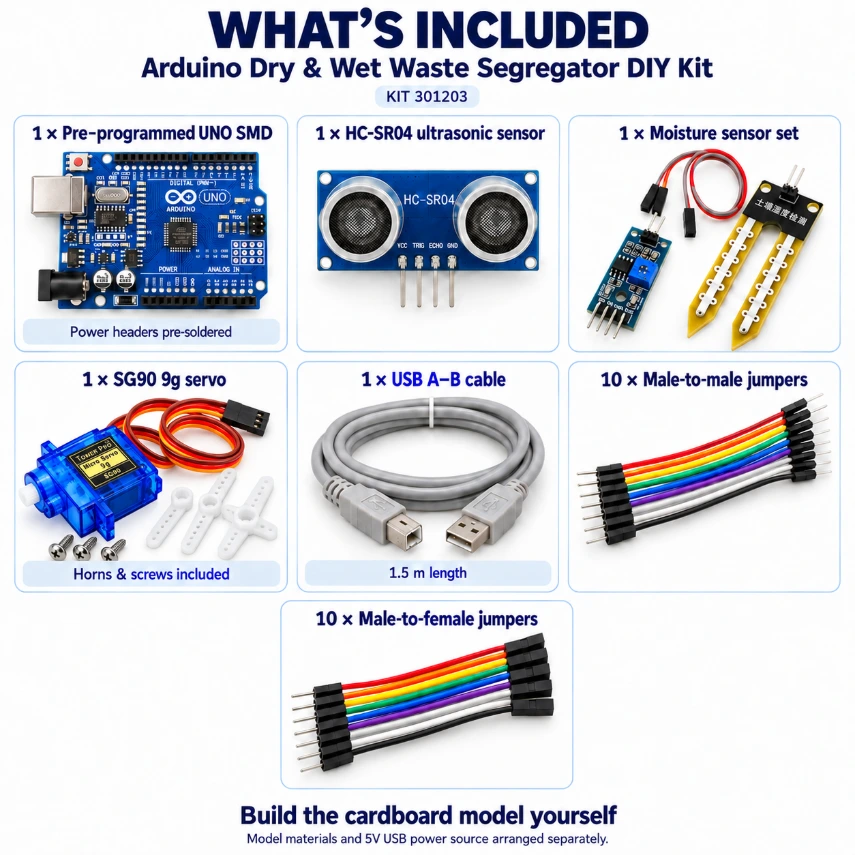
The packing list below reflects the confirmed USB-powered configuration.

Seven included product groups: UNO, ultrasonic sensor, moisture set, SG90, USB cable, male-to-male and male-to-female jumpers.
Seven product groups. Separate M3 mounting bolts and nuts are not included; the servo’s own horns and fixing screws are included.
Included itemQuantityDetail
Pre-programmed Arduino UNO SMD compatible1Shared-power headers soldered before shipping
HC-SR04 ultrasonic sensor1Detects a sample in the sensing area
Resistive soil moisture probe and interface module1 setIncludes probe-to-module connecting cable
SG90 9g servo1With supplied horns and fixing screws
USB Type-A to Type-B cable11.5 m length
Male-to-male jumper wires10Prepared plug-in leads
Male-to-female jumper wires10Prepared plug-in leads

Arrange separately

Suitable 5V USB source, cardboard, glue/double-sided tape, sensor support, mounting bolts/nuts and an opposite pivot, cable ties if used, screwdriver and suitable cutting tools. Green and yellow paper can be used to decorate the compartments.

03 / YOUR BUILD GUIDE

Build it step by step.

Open each step as you work. Keep USB disconnected whenever you change wiring or fit the mechanism.

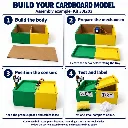
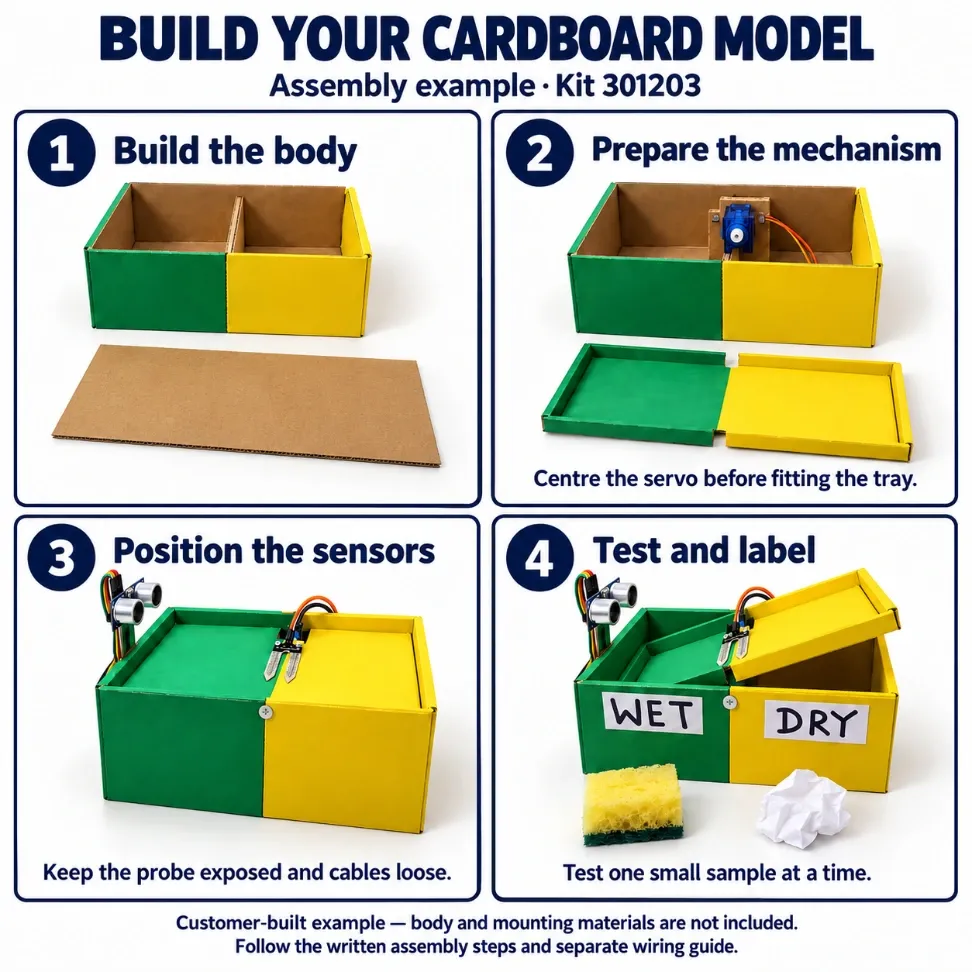
Four-stage cardboard model assembly example: body, mechanism preparation, sensor placement and testing.
Illustrative build overview only, not a measured template or an exact mounting drawing. Align the servo output shaft and opposite pivot on the same axis as described below. Verify sorting directions before labelling bins.
01Lay out the components

Match the contents against In the box. Identify the UNO, HC-SR04, moisture probe and interface module, SG90 servo, its horns and screws, and the 1.5 m USB cable. Keep USB disconnected while making connections.

02Plan the cardboard body

Plan a lightweight box with two collection compartments and a central pivoting tray. In the reference layout, the front-labelled wet compartment is on the left and the dry compartment on the right. Leave room to keep the UNO and sensor interface module outside the waste path.

03Build the base and compartments

Cut and join the customer-supplied cardboard to make a stable base and walls. Add a central divider below the tray so samples fall into separate compartments. Use green and yellow paper if you want to reproduce the reference colour scheme.

04Make the tilting tray

Prepare a lightweight tray that bridges the two compartments and can tip in either direction. Reinforce its pivot area. Dry-fit it inside the body and allow clearance from both side walls throughout its movement.

05Prepare the servo and opposite pivot

Mount the servo securely near the centre line, as in the reference. Support the opposite end of the tray with a freely turning pivot. Align the servo shaft and opposite pivot on the same axis. Arrange mounting bolts, nuts and a suitable opposite pivot separately. Choose lengths to suit your cardboard thickness; these mounting parts are not supplied.

06Mount the ultrasonic sensor

Secure the HC-SR04 to a firm raised support facing the sample placement area. Keep both circular transducers unobstructed. Position it so a sample can be detected inside the programmed range: greater than 1 cm and less than 15 cm.

07Position the moisture probe

Place the sensing prongs near the centre of the tray where each sample can contact both conductive sensing areas. Secure the probe without covering those areas. Connect its two-pin cable to the interface module. Keep the module dry and outside the sorting path.

08Connect the ultrasonic sensor

With USB disconnected, connect VCC to 5V, GND to GND, TRIG to D12 and ECHO to D11. Match the labels printed on the sensor rather than copying a colour order.

09Connect the moisture module

Connect module VCC to 5V, GND to GND and AO to Arduino A0. Leave DO unused. Check that the probe cable is fully seated at both ends.

10Connect the servo

Connect the SG90 orange signal lead to D8, red lead to 5V and brown lead to GND. Use the factory-soldered shared-power headers, matching their 5V/GND labels. Keep plugs fully seated and exposed pins away from each other.

11Inspect and test with the tray detached

Check all connections against the Wiring table. Confirm that the servo has room to move and its horn is not driving the tray. Plug the cable into the UNO and a suitable 5V USB source. Trigger a sorting cycle with a small sample in front of the ultrasonic sensor.

12Centre the servo before attaching the tray

Allow the test cycle to finish. The supplied sketch commands 90° after sorting. Clear the detection area, disconnect USB and carefully fit the horn so the tray will sit level at this returned position. Secure the horn with its correct centre screw.

13Attach the tray and secure the wiring

Attach the tray to the horn and opposite pivot without misaligning their axis. The reference uses cable ties to secure the horn to the tray; arrange suitable ties separately if following that method. Route wiring away from the pivot and collection openings.

14Run a dry-sample test

Reconnect USB. Place one small, clean, lightweight dry sample on the central sensing area, then remove your hand from the ultrasonic sensing path. Watch the tray move to the programmed dry position and return to centre.

15Run a wet-sample test

Use a small damp sample that contacts both sensing areas; do not pour liquid onto the model. Observe the wet sorting movement and return. Remove residue and gently dry the probe before testing another dry sample.

16Complete the model and repeat the checks

Secure the UNO and interface module on dry, insulated surfaces. Keep the USB cable from pulling on the board. Label the bins only after verifying the actual sorting directions. Test several small samples, one at a time.

04 / YOUR BUILD GUIDE

Wire by pin label.

Use the supplied code’s pin assignments. Connect power only after the final check.

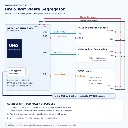
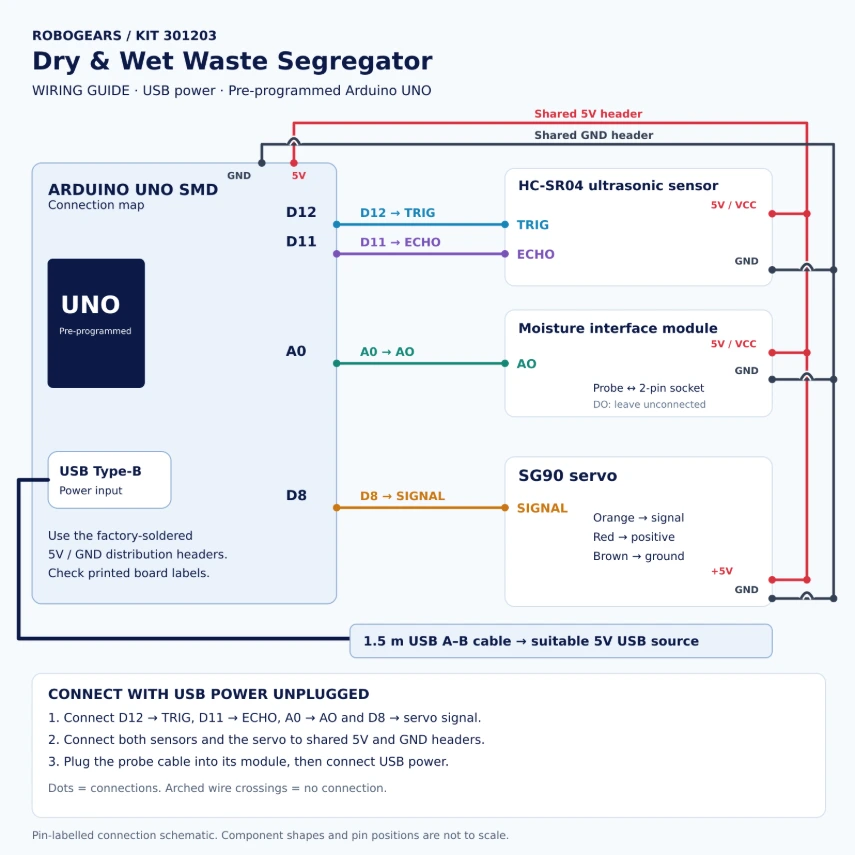
Wiring schematic: D12 to TRIG, D11 to ECHO, A0 to moisture AO, D8 to servo signal, shared 5V and ground, USB power.
Pin-labelled schematic; physical pin locations are not to scale. Follow the printed component labels and the connection table below.
Component connectionDestinationPurpose / check
Ultrasonic VCCUNO 5VPower
Ultrasonic GNDUNO GNDGround; not SDA
Ultrasonic TRIGUNO D12Trigger signal
Ultrasonic ECHOUNO D11Echo signal
Moisture module VCCUNO 5VPower
Moisture module GNDUNO GNDGround
Moisture module AOUNO A0Analog signal; letter A, number zero
Moisture module DOLeave unconnectedNot used by this sketch
Probe two-pin connectorModule two-pin probe connectorUse the supplied connecting cable
Servo orange signal leadUNO D8Control signal
Servo red positive leadUNO 5VPower
Servo brown ground leadUNO GNDGround; do not connect to 5V
USB cable Type-B endUNO USB socketPower and optional programming
USB cable Type-A endSuitable 5V USB sourceCustomer-supplied source

Before connecting USB

  • TRIG → D12, ECHO → D11, servo signal → D8, moisture AO → A0.
  • Both sensor VCC connections and servo red lead → 5V.
  • Both sensor GND connections and servo brown lead → GND.
  • Leave moisture DO unused and keep exposed connections apart.
05 / YOUR BUILD GUIDE

Your supplied Arduino sketch.

Already loaded on the board. Copy it if you want to study or restore the program.

Arduino UNO · Servo.h
#include <Servo.h>
Servo servo1;
const int trigPin = 12;
const int echoPin = 11;
long duration;
int distance=0;
int potPin = A0;
int soil=0;
int fsoil;
int maxDryValue=1;       //this value decides how much humidity require to treat waste as wet object
int Ultra_Distance=15;   //set Distance between Ultrasonic and moisture(soil) sensor in cm
void setup()
{
  Serial.begin(9600);
  pinMode(trigPin, OUTPUT);
  pinMode(echoPin, INPUT);
  servo1.attach(8);
  Serial.println("Soil Sensor     Ultrasonic          Servo");
}
void loop()
{
  int soil=0;
  for(int i=0;i<2;i++)
  {
    digitalWrite(trigPin, LOW);
    delayMicroseconds(7);
    digitalWrite(trigPin, HIGH);
    delayMicroseconds(10);
    digitalWrite(trigPin, LOW);
    delayMicroseconds(10);
    duration = pulseIn(echoPin, HIGH);
    distance= duration*0.034/2+distance;
    delay(10);
  }
  distance=distance/2;

  if (distance <Ultra_Distance && distance>1)
  {
    delay(1000);
    for(int i=0;i<3;i++)
    {
      soil = analogRead(potPin);
      soil = constrain(soil, 485, 1023);
      fsoil = (map(soil, 485, 1023, 100, 0))+fsoil;
      delay(75);
    }
    fsoil=fsoil/3;

    Serial.print("Humidity: ");
    Serial.print(fsoil);
    Serial.print("%"); Serial.print("    Distance: ");Serial.print(distance);Serial.print(" cm");
    if(fsoil>maxDryValue)
    {
      delay(1000);
      Serial.println("     ==>WET Waste ");
      servo1.write(170);
      delay(3000);
    }
    else
    {
      delay(1000);
      Serial.println("     ==>Dry Waste ");
      servo1.write(10);
      delay(3000);
    }
    servo1.write(90);
  }
  distance=0;
  fsoil=0;delay(1000);
}

Optional code upload

  1. Disconnect the tray linkage before testing changed code.
  2. Connect the UNO to a computer using the included USB cable.
  3. Open Arduino IDE, select Arduino UNO and its connected port, and paste the sketch.
  4. If Servo.h is missing, install the Arduino Servo library through Library Manager.
  5. Upload and repeat the supervised dry/wet and return-to-centre tests.
06 / YOUR BUILD GUIDE

Test before finishing the model.

Start with the servo unloaded, then use one small sample at a time.

Dry test

Clean and dry the probe. Place a small, lightweight dry sample so it contacts the sensing areas and is detected by the ultrasonic sensor. Remove your hand. Check the 10° sorting movement and return to 90°.

Wet test

Use a small damp sample in contact with both sensing areas. Check the 170° sorting movement and return to 90°. Keep liquid away from the module, UNO and connections.

StageSupplied program
Object detectionAveraged distance >1 cm and <15 cm
Settling delay1 second
Moisture sampling3 readings, with 75 ms delay per reading
ClassificationMapped average >1: wet; otherwise dry
Delay before tilt1 second
Sorting position hold3 seconds
Return90°, then a 1-second loop delay

Finish with these checks

  • Empty tray does not repeatedly trigger sorting.
  • Both sorting directions move freely and deliver samples into the labelled compartments.
  • The tray returns level and the probe cable never pulls tight.
  • The UNO stays powered throughout servo movement.
  • Probe is cleaned between tests and all control electronics stay dry.
07 / YOUR BUILD GUIDE

Troubleshoot one symptom at a time.

Disconnect USB before moving wires or adjusting the tray.

Nothing happens when I place a sample

Check that the UNO is powered, TRIG goes to D12 and ECHO goes to D11. Place one sample inside the greater-than-1 cm and less-than-15 cm range. Check the sensor faces are clear and the sample contacts the probe.

The tray moves to the wrong compartment

Disconnect USB. Check horn orientation, the mechanical layout and bin labels. The code commands 10° for dry and 170° for wet; these angles alone do not establish left/right on a differently mounted servo.

Every sample is reported as wet

Clean and dry the probe, check AO → A0 and inspect for wet residue. The mapped wet threshold is only greater than 1. Use Serial Monitor at 9600 baud to observe results before considering a code change.

Every sample is reported as dry

Check the probe cable and module power. Confirm AO, not DO, connects to A0. Ensure a damp sample contacts both sensing surfaces during the measurement period.

The servo buzzes or the UNO restarts

Disconnect USB. Look for binding, a heavy tray, misaligned pivots or tight wires. Check the source and cable. Do not hold or force the servo against resistance.

The empty model keeps sorting

Check whether a wall, tray edge or your hand is inside the ultrasonic sensing area. Reposition the sensor support and test with an empty tray. The code has no object-removal lockout.

The tray does not return level

Let a cycle finish, then disconnect USB. Refit the horn with the tray level at the returned position. Check the horn screw, opposite pivot and slack in the probe cable.

08 / YOUR BUILD GUIDE

Frequently asked questions.

25 practical answers for building, testing and learning.

25 questions

Is the Arduino already programmed?

Yes. The UNO SMD compatible board is supplied pre-programmed. No code upload is required to begin assembling the kit.

Is a complete dustbin or cardboard model included?

No. This is an electronics kit with servo horns and the servo’s own fixing screws. You arrange and build the cardboard body, tray, divider and collection compartments.

What else do I need?

Arrange cardboard, glue or double-sided tape, a suitable sensor support, any cable ties you use, a screwdriver and suitable cutting tools. Green/yellow paper is optional decoration. You also need a suitable 5V USB power source.

Is there a measured cutting template?

No verified cutting dimensions or template are supplied. Fit the structure to your parts, keep the tray light and check free movement before permanent attachment.

What USB cable is included?

One 1.5 m USB Type-A to Type-B cable. The Type-B end connects to the UNO; the Type-A end connects to your USB power source.

Are batteries or a power adapter included?

No. This kit uses USB power. Batteries, a battery holder and a USB power adapter are not included.

Can I use a computer or power bank?

Use a suitable regulated 5V USB source with enough available current for the controller, sensors and moving servo. Computer ports, adapters and power banks vary. Repeated resets, shutdowns or weak movement require checking the source, cable and mechanical load.

Do I need to solder?

No customer soldering or wire stripping is required for the supplied electronics. Shared-power headers are soldered before shipping. The cardboard model still requires cutting, fastening and gluing.

Which jumper wires are included?

Ten male-to-male and ten male-to-female jumper wires. Female-to-female jumper wires are not included in the confirmed packing list.

What happens after power is connected?

The controller waits for an object in the ultrasonic detection range. The servo may move as it initialises. Keep the tray clear and do not promise a completely motionless startup; setup() does not explicitly set a starting angle.

Where should I place the sample?

Place one small sample on the tray’s central moisture-sensing area so it contacts both conductive parts of the probe and lies within the ultrasonic sensing area. Remove your hand before observing the response.

What does the ultrasonic sensor do?

It detects that an object is in the sensing area. The supplied code starts a sorting cycle when its averaged distance is greater than 1 cm and less than 15 cm.

How does the kit decide wet or dry?

The sketch takes three analog readings from A0, constrains each to 485–1023 and maps them to a 0–100 scale. It averages the mapped values. An average greater than 1 selects wet; 1 or below selects dry.

Is the displayed humidity a real percentage?

No. The text printed as Humidity % is a mapped sensor reading, not a calibrated measurement of an object’s water content. Contact, residue and material conductivity can affect classification.

Should I use AO or DO on the moisture module?

Use AO connected to Arduino A0. Leave DO disconnected. The installed sketch uses analogRead(A0); it does not read the digital output.

What are the servo positions?

The supplied program commands 10° for dry, 170° for wet and 90° to return. The physical direction depends on how the servo and horn are mounted; verify the bin destinations during testing.

How do I centre the tray?

With the tray detached, allow a test sorting cycle to finish so the program commands 90°. Clear the sensing area, disconnect power and fit the horn/tray level without forcing the shaft. Recheck both directions after assembly.

How long does a sorting cycle take?

After detection, the code includes a 1-second wait, three readings spaced by 75 ms, another 1-second wait and a 3-second hold at the sorting position. It then commands centre and pauses for 1 second. Allow roughly 6–7 seconds under normal detection conditions; ultrasonic waits and mechanical movement can add time.

Can I place several items together?

Use one small item at a time. Multiple items can give mixed moisture contact, overload the tray or fall into the wrong compartment. Wait for the tray to return before the next sample.

Why does it repeat a sorting cycle?

The supplied program has no separate wait-until-object-removed state. If an object, hand or part of the model remains in the detection range, another cycle can begin after the delays finish.

Why are dry items being classified as wet?

Check for moisture or residue on the probe and confirm a secure AO connection. The supplied threshold is very sensitive: a mapped average above 1 selects wet. Collect observations before changing any threshold.

Why does the UNO restart when the servo moves?

Check the USB source and cable, loose connections, and whether the tray rubs or overloads the servo. Disconnect power before adjusting the mechanism. A servo that moves unloaded may still struggle with a heavy tray.

Does it detect metal, plastic or biodegradable waste?

No separate material-identification sensor is included. This project classifies according to the moisture probe response. A dry/wet reading does not establish whether an item is recyclable, biodegradable or metal.

What samples should I avoid?

Use clean, lightweight demonstration samples. Avoid sharp objects, batteries, hot materials, hazardous or medical waste, dripping liquids and heavy items. Keep the control boards and connections dry.

Can I copy or modify the code?

Yes. The Code tab includes the supplied sketch and a Copy code button. It uses Servo.h. Keep the original before editing, and retest the complete mechanism after changing pins, thresholds, angles or timing.

ROBOGEARS · Learn by building · Educational components kit · 301203
📍 Check estimated delivery
Enter your 6-digit pincode to see the estimated delivery window.
Google
Trusted by Makers,
Loved by Builders
Top Selling Products | RoboGears
🔥 Popular Right Now

Top Selling Products

Popular robotics and electronics components chosen by RoboGears customers.

View All Products →
🔥 BEST SELLER
ESP32 Development Board
ESP32 Dev Board
🔥 842+ Sold
₹420 incl. GST
🔥 BEST SELLER
Arduino UNO R3
Arduino UNO R3
🔥 1.1K+ Sold
₹280 incl. GST
⚡ POPULAR
300 RPM BO Motor
300 RPM BO Motor
🔥 500+ Sold
₹50 incl. GST
🔥 BEST SELLER
18650 Battery
18650 Battery
🔥 842+ Sold
₹60 incl. GST
🔥 BEST SELLER
IR Obstacle Sensor
IR Obstacle Sensor
🔥 1.1K+ Sold
₹35 incl. GST
🔥 POPULAR
HC-SR04 Ultrasonic Sensor
HC-SR04 Sensor
🔥 750+ Sold
₹95 incl. GST
⚡ POPULAR
4 Ohm 15W Speaker
4Ω 15W 2.5" Speaker
🔥 800+ Sold
₹235 incl. GST
⚡ POPULAR
ZK-TB21 Bluetooth Amplifier
🔥 551+ Sold
₹1,550 incl. GST
🔥 BEST SELLER
MQ-2 Gas and Smoke Sensor
MQ-2 Gas & Smoke Sensor
🔥 900+ Sold
₹130 incl. GST
🏆 #1 SELLER
Arduino UNO R3 DIP
UNO R3 DIP Development Board
🔥 2K+ Sold
₹480 incl. GST
⚡ POPULAR
MPU-6050 Sensor
MPU-6050 6-DOF Sensor
🔥 600+ Sold
₹195 incl. GST
🤖 POPULAR KIT
2WD Obstacle Avoiding Robot Kit
🔥 300+ Sold
₹1,550 incl. GST
🌱 DIY KIT
Arduino Smart Irrigation DIY Kit
🔥 350+ Sold
₹649 incl. GST
🔥 POPULAR
SG90 9G Mini Servo
SG90 9G Mini Servo
🔥 3.2K+
₹120 incl. GST
⚡ POPULAR
9V Zinc Carbon Battery
9V Original Battery
🔥 5.1K+
₹25 incl. GST
🔥 BEST SELLER
MAX30102 Heart Rate SpO2 Module
MAX30102 Heart Rate & SpO2
🔥 400+
₹795 incl. GST
🔧 REPAIR KIT
150uF 420V Electrolytic Capacitor
Samsung 40" curved TV Backlight Set
🔥 100+
₹1700 incl. GST
🤖 PROJECT KIT
Dry Wet Metal Waste Segregator Kit
Waste Segregator Components Kit
🔥 450+
₹750 incl. GST
🔥 POPULAR
CA-502MT ZK-502MT Bluetooth Amplifier
CA-502MT Bluetooth Amplifier
🔥 500+
₹635 incl. GST
⚡ PREMIUM
ZK-AS21 TPA3255 Bluetooth Amplifier
ZK-AS21 TPA3255 Power Amplifier
🔥 550+
₹3,350 incl. GST
🔥 BEST SELLER
DT830D Digital Multimeter
🔥 2.2K+
₹195 incl. GST
🔥 BEST SELLER
18650 2500mAh Lithium Ion Battery
18650 2500mAh Li-Ion Cell
🔥 1.4K+
₹120 incl. GST
⚡ POPULAR
Universal 3.7V Li-Ion Battery Charger
Universal Li-Ion Battery Charger
🔥 3.7K+
₹85 incl. GST
🔥 POPULAR
Belson 8 Inch 50W Woofer
Belson 8" 50W Woofer
🔥 450+
₹395 incl. GST
🔧 REPAIR PICK
32 Inch LED TV Backlight Strip
32" LED TV Backlight Strip
🔥 300+
₹80 incl. GST
🔧 REPAIR KIT
MI 50 Inch LED TV Backlight Strip Set
MI 50" LED TV Backlight Set
🔥 200+
₹685 incl. GST
🔒
Secure & Reliable
Safe payments & protected checkout
🚚
Free Delivery Above ₹499
On eligible online orders
🇮🇳
Pan-India Delivery
Robotics delivered across India